Tuesday, August 31, 2010

Happy Birthday to me!

So, I hope you all enjoyed my blogiversary celebration month! I had so much fun! I want to thank all of you that read my blog and comment on my posts and videos! You all bring so much joy into my life. I get a surge of excitement every time I see a comment. I have learned so much from all of you scrappers out there in cyberland and I hope maybe you have learned something from me. I am not going anywhere and have some great things planned for the blog. So, keep reading, watching and scrapping with me!

As for today's videos I have the completed mini! I love how this turned out! Be sure to watch the update video showing how I had to change the closure! The snaps I used were purchased at Joann fabrics for $1.35. I really like how they look.

As for the giveaway, it closes at midnight, so get your comments or technique submissions in and the winner will be announced on September 1st! Thanks again for all of your wonderful comments. I am so glad people are learning and loving the grungeboard series! You all rock! Love ya!


Amy - A girl who loves her husband, crazy cat, scrapping, blogging and of course TV (television!).


Monday, August 30, 2010

Grungeboard Series: Enamel & Stamping

These are the last techniques of the series. In tomorrow's video I will be putting together the cover and showing the completed mini.

First technique is the enamel. In the video you will see me rub the ink pad over only the embossed area. This is not actually correct. You can do it but to get the real enamel look just ink up the whole piece embossed parts and all. Then add embossing powder to piece and flick hard with your fingers. You will still see the embossed image but the embossing powder will be more messy and in other areas as well. this is what you want. Then heat emboss and add the dark brown ink. You will see that now you have a very rustic looking piece. Looks amazing in person. You can also do this on a tag with no dry embossing and it looks really cool an awesome background.


Next and last technique is stamping on grungeboard. Though this is one of the more simple and straight-forward techniques, it is also my favorite. I love how these mini backgrounds look. I thought it only appropriate to use the only Tim Holtz stamp set I own for this, Shabby French. I used distress inks in Fired Brick, Mustard Seed, Spiced Marmalade, Crushed Olive and Wild Honey.


Thank you so much for joining me and don't forget to join me tomorrow to see what I do with all of these pieces!

Sunday, August 29, 2010

Grungeboard Series: Experiments

So, one of the fun parts of scrapbooking is experimenting after you make mistakes. I don't know about you, but i make a lot of mistakes. When I do I do everything I can think of to salvage the thing I just messed up. That happened A LOT in today's videos. I will start out with the embossed paint. I need a bright piece for my mosiac. I wanted a yello but was not getting it as bright as I wanted. I tried a few things but what I ended up with in the end is a piece that worked perfectly! Here is what I actually did:

Inked with scattered straw (too light)
Inked with Mustard Seed (better)
Dried the piece
Embossed the clear embossing powder
Inked over it with spiced marmalade (Way too dark)
Painted it with Making Memories Sunflower paint
Let dry until a bit tacky
wiped off paint from embossed areas.

Whatever works right??


Next technique is paint on paint. I actually found this technique by mistake! I started out thinking of doing the double distress technique except with paint but the dabbers didn't cooperate as I thought they would. However, I LOVE the piece I created. I embosses the piece with the patchwork texture fade then added Stream paint over it and let it dry. Then I added cloudy blue paint over that and let it dry as well. Then I sanded off only the first layer of paint revealing the stream color. I think is is an awesome technique that I will definitely do again!


Thanks for watching me experiment and turn mistakes into masterpieces! See you tomorrow for our last techniques before the final product is unveiled!

Saturday, August 28, 2010

Grungeboard Series: Faux Metal

Faux metal is an awesome thing to do with grungeboard. You could make industrial flowers to add a masculine/feminine look to your projects. This technique is also great for any and all boy/manly projects. Really fun and also easy!

This technique can also be used with other colors of paint as well. You don't have to use just metallic paint. Using the different paints gives a shabby chic look to your project.

Hope you try out this technique and see you tomorrow for more grungy fun!


Thursday, August 26, 2010

Grungeboard Series: Crackle & Stickles

Both techniques today are easy.

First: Crackle Paint

I only own two jars of crackle paint. One is Tattered Rose. The distress crackle paints all give a matte finish after they crack.

The other I own is the distress rock candy. This paint is a clear crack, which is great because you can add any color ink underneath or use over patterned paper. Very cool and versatile. This finish is glossy.


All you do is paint this stuff on and let it dry. That's it! The thicker the layer the bigger the cracks. Once it begins to crack you can hit it with a heat gun but it cracks better if you let it dry on it's own.


Second: Stickles

I first added glimmer mist the grungeboard with Red Velvet glimmer mist. Next I embossed the piece using the Retro Circles Texture fade embossing folder by Tim Holtz. I then added the Rock Candy Stickles over top. This also dries clear giving a very cool sugar sparkle. Love this stuff!


Stay tuned tomorrow for more techniques and fun!

Blogiversary Giveaway!

What's the best way to celebrate my blogiversary and birthday month??? GIVEAWAY!!! So here is a video showing the goodies I will be giving away. To enter all you have to do is leave a comment here on this post. If you want some extra entries - just try a technique from the grungeboard series. For every technique you try, you'll get another entry. Just leave me a comment telling me where to find your project or simply send me an e-mail at amyvlovestv@yahoo.com. No youtube comments will be counted.

I can't wait to see what you guys make! I hope you are enjoying the grungeboard series! Thanks for visiting my blog!

Wednesday, August 25, 2010

Grungeboard Series: Mediums

Today I get a bit messy. I am playing with multi mediums on grungeboard.

The first technique is a way of adding vintage pages to grungeboard. Now, you can use other adhesives to do this, however, this works best. What the multi-medium matte does is to adhere it down so it won't pull up on the edges over time. When I took the class with Tim Holtz, he told us that this is one of his favorite adhesives!

This is super simple. Just keep in mind that this medium becomes waterproof when it dries. This means that if you have inky hands and this medium dries over it - you have inky hands that are waterproof! Of course there are a ton of reasons why drying waterproof is exactly why to use it! Another tutorial for another time.


The next technique involves using Glass medium gel. This stuff is so awesome! It is a texture medium that adds tiny glass beads to you project. By itself it dries clear but you can add paint for a whole new look. When it is dried it is mailable and the glass beads are permanent. I added some ink to the grunge pieces then added the glass bead gel over top. When it dried it created amazing texture and shine. I highly recommend this product!

You can look at the pictures below to see how amazing this technique looks with paint mixed in the glass bead gel. I took a dollop and added Ranger Cloudy Blue paint to it. The I took another dollop and added Ranger Stream paint. I then took the cloudy blue and added it to the grungeboard page. I dragged the stream mixture through it. I LOVE how it turned out. Best part - it is simple. All you do is slap it on and let it dry...done!
See you all back tomorrow for more grungy fun!!


PRODUCTS USED:
Multi-Medium
~Claudine Hellmuth Multi-Medium Matte
~Distress Ink: Vintage Photo, Broken China
~1924 Vintage dictionary
~Vintage Accordion Music Paper

Glass Bead Gel
~Golden Glass bead Gel
~Distress Ink: Dusty Concord, Spiced Marmalade
~Ranger Paint Dabbers: Cloudy Blue, Stream

Tuesday, August 24, 2010

Grungeboard Series: Ink

So, now let's get inky! Now we get to start having fun. I start out showing the differences in how chipboard and grungeboard take inks. I first compare them both using Glimmer Mist. I love how well grungeboard takes the mists. It doesn't warp or split, it is even coverage and did I mention it doesn't warp???

Next, I tried the Colorbox Fluid Chalk ink. I think both the chipboard and grunge took the ink about the same. I love how opaque this ink is!

Lastly I had to use the distress inks! I think they both took that very well too. You will notice I talked a bit about the texture of grunge. I love adding texture to a project so this is great for me. I am just trying to show the difference between chipboard and grunge because it's a question that I am often asked.


Now onto actual techniques!!! First up: Double Distress

This is super easy to do and looks Awesome! You can do this technique on cardstock as well. Start off by embossing your grungeboard. Then pick two colors of ink. Ink the grunge in the lighter of the two with a blending tool. Next, just drag the darker ink directly over top so only the raised portions get inked. You can do this with tone on tone colors, contrasting colors - the possibilities are endless! Just experiment and have fun! Note: After the video I added some chipped sapphire to the edges of the double distress page and added an embellishment to one of the grunge pieces.


The mini I am using is the Tim Holtz Grungeboard Bracket Book. It is Awesome!

Here are the other products I used in the videos:
Inking Video:
~Tattered Angels Glimmer Mist: Red Velvet
~Colorbox Fluid Chalk Ink: Olive Pastel
~Ranger Distress Ink: Pine Needles
~Tim Holtz blending tool with foam

Double Distress Video:
~Grungeboard Plain Shapes
~Grungeboard Bracket Album
~Tim Holtz Texture Fades: Bingo, Dot Matrix
~Ranger Distress Ink: Weathered Wood, Broken China, Chipped Sapphire, Victorian Velvet, Aged Mahogany

Monday, August 23, 2010

Grungeboard Series!!!

No, you are not seeing things, it is time for my Grungeboard Series! So, first let me tell you a bit about how this week will work. I will begin with an intro video explaining things and also a video about the basic differences between chipboard, grungeboard and grungepaper. Then, each day will have technique videos. Some days will have just one, some days, two. I will have pictures of all the completed pieces on my blog each day - just in case the video quality doesn't show them well enough. Bear with me in regards to the videos - I am not great at editing and some may not have intros or a goodbye but the goods are there! Any questions about them - please just leave me a comment or send me an e-mail at amyvlovestv@yahoo.com.

I would love it if you all try some of these techniques and leave a comment telling me where to find the pictures. Play along with me!

I will be demoing the techniques on pieces of grungeboard, all pieces are from the Plain shapes Grungeboard pack. These will all be combined into an awesome cover for a mini I am making about my Tim Holtz obsession. I will also be using some of these techniques on the pages of the mini along with Tim Holtz Lost and Found paper stack.

On August 31st, my birthday, I have a gift for you as well. I will share the prepped mini and also share my Blogiversary giveaway. this giveaway will only be for my Blog comments since it is a Blogiversary thing!

I hope you have as much fun with this series as I did making it. My hands are inky, are yours???


Here is the Basics Video as promised! See you tomorrow for some technique videos!

Thursday, August 19, 2010

Beer

Guess what I am doing tonight?? I am making beer! From scratch! Hubby and I bought my brother a gift certificate to make beer for his birthday. The place is called Incredibrew in Nashua, NH. You can make wine, beer or rootbeer. It is super fun! Hubby and I made wine one year for my birthday. Dave gave a gift certificate to make beer to his best man for a gift.

It is cool because you get to name your brew and create a custom label for it. I am excited. I will be cataloging it all for a Beer mini! Super fun! When I get back, I will update with the kind we chose to make. There are SO many to chose from, it will be hard to pick just one. I can't wait to get brewing!

See you tomorrow for another something Yummy!

Wednesday, August 18, 2010

Blogiversary Haul - sort of!

Check out the new addition to my scrap room!!! My pegboard is hung. I love it! It is perfect to hang my clear stamps and my Tim Holtz stuff. I even have a spot for my Friends frame! I am so happy and thankful to my dad for building it for me. Thanks Daddy! You are the best! Love ya!

Tuesday, August 17, 2010

These are a few of my favorite things

Today I thought I would share my favorite blogs. I have many more than I will share today but I jump for joy when I see these sites have a new post.

The Scrap Beach Community

This is an online community www.thescrapbeach.ning.com. Not so much a blog but a place to share photos, videos, chats and more! I love the people on this site. They make me happy and are a caring special group. Check it out if you haven't already.

Life's a Scrap Beach

This blog, as you might have guessed, is the blog of the founder of the community above, Kathryn! thescrapbeach.blogspot.com is a great blog. This site is where I got into mini albums. Kathryn literally taught me how to scrapbook. She has a great style and way of explaining things that just makes you think you can do what she does. I love her as a person and as a source of inspiration! Thank you for everything Kathryn!

Kristina Werner

I love this blog. www.kwernerdesign.com/blog Kristina makes mainly cards (though she has just started doing layout videos
every other week! YAY!) She does a video every Monday called Make a Card Monday (MACM) and also a video on Friday (Finally Friday). She has a great style, amazing ideas and uses patterns in a unique ans spectacular way! She is super inspiring. She makes Mondays happy! If you haven't seen her yet - run and check out her videos!


My Favorite Youtube Gals


I love the youtube e videos from livelovescrap (Bona @ keeponscrapping.blogspot.com), mybutterflykisses12 (Arlene @ butterflykisseswithlove.blogspot.com), Jadedstudios (Jade @ www.jadedstudios.blogspot.com) and so many more.

Thank you all for the inspiration! I love you all!

Monday, August 16, 2010

Wishlist

OK, so you may be wondering why there is no video today. There are two reasons actually.
1)My scrap room had been taken over by tools. My dad made me a framed pegboard and came over to hang it. The thing you must know about my dad is he is a lot like MONK. He is anal and picky and did I mention anal? He thought he knew how he would hang the board but after getting a screw stuck in my wall - he decided that way was not going to work. He left all of his tools on my craft desk so he can come back again to finish the job. So, long story short, I don't have room to create, plus with that many Manly tools around - I can't get crafty.

2) I am a bit lazy today.

So, instead of a video, I thought I would share my current wishlist. Not only for fun but also in case anyone in my family is wondering what to get me for my birthday. I like to give them ideas. I like to give them a bunch of things to choose from I don't expect all of these things, they are just suggestions. So here we go, in order of want.

Non Scrappy: Coffee Maker


Scrappy:
First: Cropper Hopper 10 drawer storage unit (Joann.com)


I think this would make my organization a breeze!!!


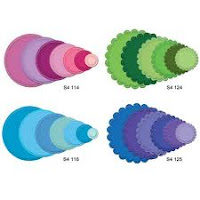
Second: Spellbinder dies (AC Moore)

<
I don't have any of these. I would love these for journal spots. I would like the scallop circles and the regular circles to start out.


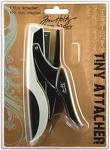
Third: Tim Holtz tiny attacher


This thing is spectacular!


Fourth: Halloween in Wonderland by Graphic 45 (online or Ink about it, Newton, MA)


I love this line. I would love the 12 x 12 and the 8 x 8 pads. I like that these papers have the old fashion cartoon images and the Halloween aspect is minimal. I would not use it for a Halloween mini but for a wonderland instead. I fell for these images and it inspires me.


Fifth: Alice stamps (www.oxfordimpressions.com)


These obviously goes with the collection above but even alone they are really cute images. Very fun stamps.


There are a bunch of other things on my list like, glossy paper by Ranger, Sticky back canvas, alcohol inks but those can wait. Christmas is only 4 months away! LOL!

Anyway, that's what I have for today. I am working hard on the Grunge series so be sure to check back soon! Thanks for stopping by!

Friday, August 13, 2010

Yummy!!!

It's Friday again! Another yummy treat. As most of you know, I got married in Las Vegas. It was a small destination wedding. We had a party when we got back home for all the family and friends who didn't attend the actual wedding. For this party my hubby and I wanted something a bit different. We had both been to weddings before where they had a raw bar or an oyster bar. I don't like those things so I decided we should have a bacon bar instead. My hubby LOVES Bacon! He even owns a "Bacon is a vegetable" T-shirt!
So, here are two recipes from the bacon bar. Both are delicious!


Bacon-wrapped dates

Ingredients:
24 large pitted dates
12 slices thin bacon, halved crosswise
2 ounces goat cheese
½ cup finely shredded sharp cheese

Directions:

1. Preheat oven to 475 degrees
2. Open the top of the date (tearing them open as little as possible, set dates aside.
3. Mix the shredded cheese with goat cheese and put mixture into a pastry bag with a round tip (large tip)
4. Stuff dates with goat cheese mixture and wrap dates with bacon
5. Place dates on a baking sheet, seam side down (you can also use toothpicks) at least ½ inch apart
6. Bake until bacon is golden and crisp, 8-15 minutes. Drain on paper towels and set aside to cool briefly before serving.
7. Remove toothpicks.


OK, just to let you all know. I don't like dates, but I love these! Give them a try!

Bacon Cheddar Chive Muffins

Ingredients:
• 6 slices bacon
• 2 cups all-purpose flour
• 1 1/2 tablespoons white sugar
• 2 teaspoons baking powder
• 1/4 teaspoon salt
• 1 1/2 teaspoons garlic powder
• 4 teaspoons dried chives
• 1/3 cup grated Parmesan cheese
• 1 cup shredded sharp Cheddar cheese
• 1 egg, beaten
• 1/2 cup milk
• 1/2 cup vegetable oil
• 1/2 cup condensed cream of mushroom soup

Directions:
1. Place bacon in a large, deep skillet. Cook over medium high heat until evenly brown. Drain, crumble and set aside. Meanwhile, preheat oven to 400 degrees F (200 degrees C) and lightly grease 12 muffin cups or use paper liners.
2. In a large bowl, combine flour, sugar, baking powder, salt, garlic powder, chives, Parmesan cheese, cheddar cheese and crumbled bacon.
3. In a separate bowl, combine egg, milk, cream of mushroom soup and vegetable oil. Stir this mixture into the flour mixture just until moistened. Spoon batter into the prepared muffin pans.
4. Bake in preheated oven for 20 minutes or until a toothpick inserted into a muffin comes out clean.

These are so yummy and super easy! Don't forget to eat your vegetables!

Thanks for another great Blogiversary week! See you all on Monday!

Thursday, August 12, 2010

Tim Holtz Fragment Project

I have been wanting to do this project for EVER! Finally a product came out that made my job so much easier and it actually got finished!

I purchased this Tim Holtz ink storage case a very long time ago. I wanted to do the same thing to mine that Tim did with his, which is to add fragments to the case. This gives the metal case a bit of style. I just never got around to finding small bits of paper to attach to the fragments. I didn't want to use any big piece for just one small fragment and I didn't feel like my scraps all went together. Needless to say - it never got done.

Then I picked up the Tim Holtz Lost and Found paper pack on sale at Michaels and my problem was solved! Tim "the genius" has made using fragments SOOOO easy! I used 1 whole sheet of the 2" x 2" paper pieces and made all my fragments at one time all together so it wasn't a big mess. It worked like a charm!

These would work great for not only adding to the storage case, but for adorning boxes, covers of minis, scrapbook pages, mini album pages, cards etc. It is super convenient to make a bunch at once and have them on hand to add to a project.

You don't need to use the Tim Holtz papers for this either. These embellishments can be made with left over scraps on any project and just kept in a tin for future use on a project. Everyone has probably used the fragment charms but this shows a few uses for the plain fragments.

I love the final result and need to get more fragments to add around the edge to finish off the case. But so far I think it looks great! I hope you like this project and that it inspires you to create something using fragments!


Thanks for watching and see you tomorrow for more fun!

Wednesday, August 11, 2010

Blogiversary Haul


Here are a few items I picked up recently. Just a few things bought on sale, with coupons, at the closing store on discount. I have recently had to really shrink my scrap budget. Which is not easy when you see such gorgeous things everywhere you look. I am trying to only buy staples that can elevate cheaper materials. I am altering and making so many items myself now that has made a change in how I shop.

I have been inspired by Kathryn at the Scrap beach. Though she has a lot of stuff they are basics that last and go with many projects. I am thinking of trying to scrap with page kits like she does and see if I like it.

In this video I show some stamps I have been accumulating. I have a lack of background stamps and journaling stamps. I tried to add a couple to my stash. I love these so much. Cling stamps are the best of both worlds. Rubber and easy storage - how can you go wrong! Plus they are the size of a standard card face. FUN! I am I messed up on the video and called the Hero arts stencil flower a die instead of a stamp, you know what I mean!

Anyway, hope you all are enjoying these posts! Tomorrow - a Tim Holtz project! Stay tuned!

P.S. - A guilty pleasure is back on TV! Check out Flipping Out on Bravo! Love that Jeff Lewis!

A Crazy Giveaway!!


OK - I will have a blogiversary post today too but I thought I would share a Crazy giveaway from another blogger named Amy. Check out her blog and giveaway HERE. She is giving away a BUNCH of paper! Her work is awesome! Anyway, thought I would share! Be back later for a blogiversary post.

Tuesday, August 10, 2010

These are a few of my Favorite Things!

So it is Tuesday and time for another installment of favorite things! I thought this time I would focus more on my favorite things in my scraproom.

I love the color and the butterflies on my wall. Those two things put me in a great state of mind. Calm, happy and ready to create! I love the little basket from Michaels that holds my bling and a few mini roses. I keep it on my desk and it just looks pretty to me.

I love my Cuttlebug - of course I would love a Vagabond or Big Shot - but my Cuttlebug gets the job done and is one tough little machine! I am LOVING the Tim Holtz dies! Especially the Tattered Floral. I love the jean flower I made for the beach mini.

Of course, like everyone else, I love the white prima flowers. I love to alter them with inks, glimmermist, smooch and more! So versatile and easy to match each project.

I am obsessed with my Martha Stewart butterfly punches. I have (2) - punches that create a total of 3 sizes of butterflies all the same style so i can mix them together. I use them often to add that final touch.

I also love anything Tim Holtz - I am just plain crazy over his stuff! Distress inks, rock candy, masks, dies, stamps, tools, I love that you can go vintage, distressed, grungy or even clean in regards to style. I am a fan through and through and just wish I would win the lottery so I could buy his entire line of products. I get what I can, slowly. I have a great Tim inspired project to show you on Thursday so be sure to check back for that!

Most of all I love getting comments, So leave one will ya??? LOL! Have a great day and I will be back tomorrow with a haul.

Always,
Amy

Monday, August 9, 2010

Bubbly Birthday Card!


Ok so happy Monday everyone! Today I am sharing a card made for my nephew's Birthday. He is now 5 years old. I wanted to make him a card that he would love. He is a super swimmer and has a fish in his room. I decided to break out my "Sushi Bowl Party" stamp set from Stampendeous. I love how cute it turned out.

I used some watercolor paper to stamp my images. I cut a wave out of computer paper and used it to mask the top of the fishbowl as I inked it blue. I colored all of the images with Distress inks and a blender pen. I added some stickles to the cupcake icing and some faux stiching to finish off the card.

My favorite part of this card are the bubble strings on the balloons. I hope you like it! He did, which made the 2 hours worth it!

Some might call me crazy to spend that time making a 5yr old a card - I call it being a great crafty aunt!

Hope you like it! Blogiversary week 2 has officially begun!

See you tomorrow!

Friday, August 6, 2010

Yummy!!!


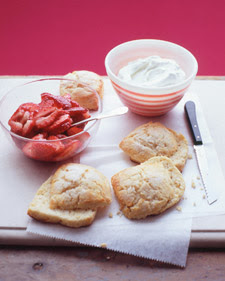
Here is my go to summer dessert recipe. It is super yummy. I think you all will love it!

Serves 8

* 1 1/2 pounds (about 6 cups) fresh strawberries
* 1/4 cup plus 1/3 cup plus 1 tablespoon sugar
* 2 1/2 cups all-purpose flour (spooned and leveled), plus more for dusting
* 1/2 cup (1 stick) cold unsalted butter, cut into small pieces
* 2 1/2 teaspoons baking powder
* 1 teaspoon salt
* 1 cup milk
* Whipped Cream

Directions

1. Preheat oven to 425 degrees. Make the sweetened strawberries: Hull and quarter strawberries; toss in a medium bowl with 1/4 cup sugar. Let stand until syrupy, tossing occasionally, at least 20 minutes (and up to 1 day, covered and refrigerated).
2. In a food processor, combine flour, butter, 1/3 cup sugar, baking powder, and salt; process until mixture resembles coarse meal. Add milk; pulse just until moistened, 4 or 5 times. Do not overprocess.
3. Turn out dough onto a lightly floured surface; with floured hands, gently pat dough into a 4-by-8-inch rectangle.
4. Dust a large knife with flour; cut dough into 8 squares. Transfer to a baking sheet; sprinkle with 1 tablespoon sugar. Bake until golden, 25 to 30 minutes; cool on baking sheet. To serve, split biscuits with a serrated knife; layer with berries and whipped cream.


Give it a try! Have a great weekend. I hope you guys are enjoying the Blogiversary so far. I will be back on Monday. Have a great weekend!

Thursday, August 5, 2010

Butterfly Layout

Today's blogiversary post is a layout! Simple, yes, but it is very me. I used glimmer mist, masks, Tim Holtz of course! This is the first time I used the fanciful flight die and I love it! I decided against using the overlay on the wings and just play with some shine and texture instead.

I hope you like the layout! Thanks for stopping by today! I have something a bit different for tomorrow, so be sure to check it out!

Wednesday, August 4, 2010

Blogiversary Haul

OK, Wednesdays are Haul days during the Blogiversary month. I haven't done a haul in a LONG time. I have been buying only when on sale, with coupons or when a store is going out of business (Sad!). I have been shopping less which is good and really waiting for those great deals before pulling the trigger. So there are a few things to show you and I have separated them into a haul a week.

The first is a haul of fixtures that I got from a local scrapbook store that recently had to close. I was able to get a bunch of great deals (some of which I will show you later) and a few cool fixtures. I got a Making Memories mat for only $5.00! I got the really cool lamp for $10 and a cup holder / heat gun holder for $10 as well! Very cool! I love that they don't take much room on my table.

I also show my paper sorter. I got this for super cheap at hobbylobby.com with a 50% off coupon and free shipping. A great deal. I LOVE it! I have been complaining about how I store my paper since I started scrapbooking and now I am a happy camper!

So my hubby helped me put it together because he is super sweet. So, of course, once I fill it with my paper I show him so he can see how awesome it is. He says, "Wow, that's a lot of paper!" I say, "Wow, I was just thinking the exact opposite and thinking how I really need more colored cardstock!" Mars vs. Venus strikes again right?

Anyway, I hope you enjoy my new fixtures. It is sad that Scrapbook Island had to close in order for me to get these goodies but I will think of the store and friends every time I use them.


Thanks for listening and be sure to tune in tomorrow for another Blogiversary post!

Also - I will probably run out of things to blog about in a week or so, so feel free to let me know what things you would like to see or have me do! Just be kind - this isn't fear factor or anything! LOL

Tuesday, August 3, 2010

These are a few of my Favorite Things

I bet you are all singing the tune from Sound of music now! LOL! So, during my Blogiversary month, each Tuesday I will be sharing some of my favorite things. I am going to start out with my favorite basic tools. I wouldn't say these are must haves but I certainly can't live without them now that I have them. I am sure you have all heard these raved about but I thought I would add my two cents.

First - My ATG gun. I know you've all heard about these wonderful tools. If you don't have one - get one! They now come in PINK for a CRAZY low price at www.customcrops.com! That would have saved me from altering mine (twice!). I love it now - a textured dark gray with cool silver rubons and bling! I use this tool on every project. Love it!

Second is my ranger craft sheet. Mine has certainly taken a beating but still works like a charm. I use it when I stamp, ink, glue, etc. I basically use it for everything except cutting. It is invaluable to get great blending technique and keep your mats from getting all bumpy with glue and glitter.

Third is the Tim Holtz ink blending tool (with foam or felt I love both for different uses!) With the foam it creates beautiful blending effects and soft edges. With the felt, you can play with alcohol inks - a new pass time of mine! Love them!

Fourth fav is my Tonic guillotine trimmer. I LOVE this thing! It always cuts a straight line...ALWAYS! I know that is what all trimmers claim to do and should do from a function standpoint but I have three trimmers in my closet that don't. I cannot tell you how frustrated I would get when I would cut a card, fold it and it was off a little - oh man I would get so mad! Finally I had had enough! I broke down and bought this trimmer and it was, hands down, the best scrap purchase I have made yet! I love it and it cuts chipboard! Highly recommend it and could go on forever!

Fifth basic that I cannot live without is a computer. I use this tool more than any other for scrapbooking. The inspiration from fellow scrap buddies on youtube and blogs is a MUST for learning and growing into this craft. When I first started I was clueless about what tools to buy, what techniques looked too scary (embossing) and how to approach a layout. I wasted money before I found the tools that worked best for me. I have learned so many techniques online. I have had so many different teachers over these 2 years and my scrapping has evolved so much. I learned you can scrap about your trip to the dentist and make it a really cool addition to a scrapbook. I go to the internet for ideas, for support, for friendship, for help when I am stuck, for tips on where to shop, to find out what's new and so much more. The computer is also where I do a lot of my journaling. I love handwritten journaling but sometimes you need to type it out first to edit and prevent those scratched out words. It is also nice to just type and print sometimes.

So there are my top five basic tools I need when I scrapbook. I know there is nothing earth shattering here and most, if not all, of you share my love of these things. I just wanted to honor the basics that help me do what I do. What is you favorite tool?

Thanks for listening! Please leave a comment and tune in tomorrow for more Blogiversary fun!

P.S. - How do you like the new background for the blog??

Monday, August 2, 2010

Blogiversary has officially begun!

OK! August is here, you know what that means??? Time for my blogiversary month! So here is how things will go. I will be posting like crazy from here on in this month. I will have 3 video blogs a week and other random thoughts from my head in between! I will be showing minis, layouts, cards, and more! I am sure my Finn will be making an appearance, of course. The illusive Grunge series will finally happen! There will be a giveaway on August 31st (My birthday!). Tons fo fun right???

OK, onto my first post, The Beach mini!

My mom and grandmother go to the beach every year for mother daughter bonding mini vacation! I knew this trip was special to them and wanted to make my mom a mini album for her to preserve her memories. Truth be told - it was a paper line that prompted me to make this mini. The Graphic 45 "On the Boardwalk" papers just had the perfect style for a beach mini including pictures of my grandmother. I knew it would be a great mini! This is my first paper bag mini and also my first shot at vintage. I am not usually a fan of the vintage lady images but in this case it just fit! I had a blast making this mini and I think it turned out great! I hope you like it!


Don't forget to leave comments and check back tomorrow for more Blogiversary fun!